Squeezing the maximum out of the FujiFilm X-Pro1.
Update: A slight bug has been identified with this workflow where it appears not to work well with the Fujinon 18mm lens. This is because the camera applies an automatic distortion correction onto the JPG files which causes a misalignment error. This method still works with the 35mm, 60mm and all adapted lenses with the distortion correction options turned off.
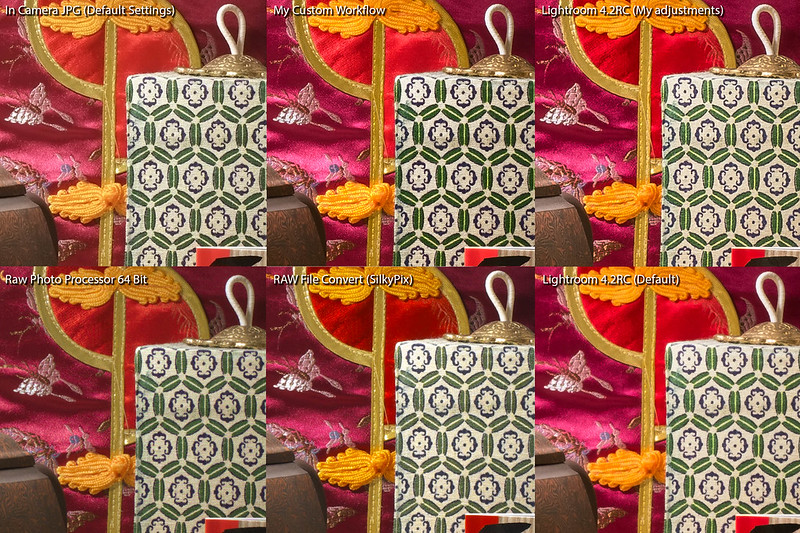 |
| Early examples comparing the various RAW processing. My finalized version is less contrasty and punchy. |
I'm going to focus on RAW processing images with the FujiFilm X-Pro1. One of the significant issues is the lack of a good processor. In fact the in camera JPG files are so much better than even the packaged RAW processing software made by SilkyPix specifically for the X-Pro1. The software is horrible to use and poorly translated and very unintuitive for seasoned image editors. However it does offer some very sophisticated controls once you learn what each thing does, however despite that, it still doesn't match the JPG images well. One of the major issues is an odd artifact that appears in some details. It almost looks like a colour noise and it maybe subtle, but once you start to adjust your image you really start to see it.
Regardless, I tried several other RAW editors and Lightroom being my main program was what I settled with, however it too did a poor job of processing the FujiFilm RAF files.
In my quest to squeeze every little bit of detail out of this camera I started to think about techniques to improve it. With 20+ years experience in imaging, I figured I could come up with a better way to improve the processing of the images.
One thing to point out, this is not exactly the simplest thing to do, but what it will give you is absolutely the most detail we can get out of our X-Pro1 until a better RAW processor with decent workflow comes along. For those of us that use Lightroom as our bread and butter, this is for you. If you don't, it could still in theory work, but it doesn't account for all the issues with the various RAW processors. This isn't for everyone, but for those of us that might have the software and want to maybe tweak the most out of landscape image for example, it's worth it. I tried to keep this as simple as possible. The steps are pretty rudimentary, and if you're already familiar with Lightroom and Photoshop, this is pretty straightforward.
I had several objectives when I set out to do this so first my goals of why I did this:
- Eliminate watercolour effect: As seen in Lightroom
- Improve details: To at least the levels seen in the JPG files
- Eliminate Chroma Artifacts: As seen in both RPP and SilkyPix
- Maintain Dynamic Range: Maintain a high dynamic range for editing
- Colour Accuracy: Maintain colour accuracy that matches other RAW processor
Secondly the good news is that no sharpening algorithms have been used in this workflow. The details you are seeing are genuine details from the camera, not artificially created by unsharp mask. In most cases I would think you would forgo any additional sharpening after you've done this technique.
How all this came about was after I pondered on a theory where I had an 'a ha' moment. I knew that the best files come straight out of the camera, but JPG images are only 8 bit and really you're lucky to get plus or minus one stop of adjustment from those. But I also theorized that the luminance channel out of the in-camera JPG file might yield better details than the RAF files. I also knew that of the only three RAW processors that support the X-Pro1, Lightroom was the only processor that didn't exhibit the chroma artifacts.
So I thought if I could somehow take the image detail out of the luminance channel of a JPG processed file, and replace the luminance channel of the Lightroom colour processed images, I should have a higher detailed file with no colour artifacts. So I decided to try that out and brought the file into Photoshop where I converted it from an RGB image to a LAB image. Luminance in an LAB file controls how dark an image looks, but ultimately it also controls the details of the file. Therefore if I replaced it with a 'better' one, should it not make a better image? To my discovery it does. However it's not as simple as just taking the luminance channel of the JPG file and just replacing it.
You need to start off with an appropriate JPG image, once you have that you can begin to replace the Luminance channel in the original RAW file. To do this here's the step by step procedure.
- Set your camera to write both RAW + Fine JPG images Make sure you set the best JPG image quality as possible. (FYI, you can actually import any past RAF files and generate a new JPG image through the in Camera RAW Processor. Just put it on an SD card and bring the Raw Processing menu up).
- Keep the Film Simulation at Provia Standard
- Change Highlight Tone to -2, Shadow Tone to -2 sharpness to medium hard (+1). This step is important to maintain close/accurate colours and your dynamic range. You should also set your color space to AdobeRGB
- Shoot as you would normally
- Open Lightroom and import your files
- After it's been imported, shut off the default Sharpening in Lightroom (select the Develop module, open the Detail panel, and set Sharpening to 0).
- Select both images and right-click on them, choosing to edit them in Photoshop. You will be presented with a dialog of edit-in options when doing this. Choose "Edit with Lightroom Adjustments". If you want to do a little noise reduction, you can do so on the JPG image before you send it to Photoshop. If you want to match the in camera JPG perfectly you can also set the EV +1/3 a stop.
- In Photoshop convert both JPG and RAF file to Lab Colour, under Menu: Image>Mode select>Lab Color (If you haven't made this the your default in Lightroom make sure you set up Photoshop to open your files as 16 bit images).
- Select or switch to the JPG file and select the Channels palette under Menu:Window>Channel. Click on the channel labelled 'Lightness', select all (Menu: Select>All) and copy this channel.
- Select the RAF/RAW file and select the Channels palette under Menu:Window>Channel. Click on the channel labelled 'Lightness' and then paste over this channel.
- Save results and what you should end up with is a 16 bit TIFF file that you can adjust like a RAW image.
 |
| Click to see the full sized file |
Under the sharpening panel in LR
Amount 57
Radius 3.0
Detail 42
Masking 23
For most applications, this does a pretty good job of things. It's less complicated than the one above, and it does for the most part eliminate most of the watercolour appearance. I set this up as a preset and then make any other adjustments afterwards. Leave the amount slider alone and use the Detail slider if you need to do any sharpening.
The whole process is still in early experimentation and I'm always trying to tweak it and refine it more. You can follow some of the discussions and further development on this forum discussion:
http://www.flickr.com/groups/fuji-x-pro1/discuss/72157631578894598/#comment72157631591043633
Read my follow up article, which is far more technical but even better quality:
http://frontallobbings.blogspot.ca/2012/11/super-detail-with-fujifilm-x-pro1-raf.html


Your lightroom formula preset works very nicely. Thanks.
ReplyDeleteIt is time consuming, but sometimes well worth it.
DeleteI am considering purchasing an X-Pro 1 but use Aperture 3 as my main image processor; do you know if Aperture 3 offers RAW support for the X-Pro 1?
ReplyDeleteNo not at this time. There's rumours floating about that it's coming but our guess is as good as any when Apple will release that.
DeleteI tried it and it works well... quite a lot of work but for some shots more than wort it!
ReplyDeleteespecially for landscapes where you want to squeeze every last detail
DeleteI am not sure that Apple is updating anything on Aperture anymore. I run a lot of different programs on my Mac for my students to see but the Apple stuff seems to be sitting still on a lot of cameras and upgrades.
ReplyDeleteIt's very annoying the pace that Apple is going with keeping up with what is current. Actually more disappointment than anything. I hope for future upgrades, but seems to be futile at best.
DeleteI have tried your technique and find it brilliant. Yes, several steps, but you get a quality that is worth saving and sharing. Thanks.
ReplyDeleteJim
Glad to hear it's worked out. I've found some other techniques that are even better and far more complicated, but this one is the easiest one of them all.
DeleteThis is a response to a comment made on Fuji X-Forum by TomasT http://www.fujix-forum.com/index.php?/topic/6655-better-image-quality/
ReplyDeleteI've never deleted any posts by him, and secondly, I make no claims that this improved dynamic range (my goal was to preserve it, but this technique only accomplishes a percentage of that). The goal was to get more detail which it does without post sharpening. Yes, JPG out of the camera does do sharpening, and of course clipping 8bit channel and replacing a 16bit channel comes with consequences. However it does retain far more latitude than a JPG file when you want to do edits and also even the JPG sharpening still has far more detail than what is processed by Adobe Camera RAW. Proof is in the Pudding they say.
It should also be pointed out that the RAF files are not 16 bit files anyhow. They are 12 bit files, which were confirmed when I analyzed the files in DCRAW which gives me information that confirms it to be be a 12 bit RAW file.
Lastly, if more fine texture details and more leverage to adjust your files is not what you're after, then fine, Zero reward, but since I've done comparisons with the JPG in extreme edits compared to the modified RAF files and see significant difference, there is a benefit and many others have gotten to appreciate the technique.
I apologize if you thought I had deleted your comments. I did no such thing, and nothing is perfect and there are compromises when doing any kind of hack like this. For many this solution provides them some satisfaction that they can have a solution to correct for the deficiencies of other RAW processors. I've also since moved on to far better and complex techniques(http://frontallobbings.blogspot.de/2012/11/super-detail-with-fujifilm-x-pro1-raf.html). These techniques which are far more advanced than the ones listed here do give you a full 16 bit file from the 12 bit RAF files. But I don't believe you'd agree regardless because of what you think of my knowledge. Regardless, no disrespect to you, but if you don't explore something different, you'll never figure out how to better what you did before.
Not bad at all. But honestly I guess based on what one shoots I really haven't had any major issues that I can think of.
ReplyDeleteI just started to experiment with Photoninga. It is not as feature full as Lightroom but can work along with it. I save my work in Lightroom as tiff and then open it in Photoninja and the image enhancement is quite good. If nothing else it is worth a look by anyone interested.
http://www.picturecode.com/index.php
Happy Holidays,
Elliot
Under the sharpening panel in LR
Amount 57
Radius 3.0
Detail 42
Masking 23
I haven't used their software in a while, but if I recall, I think they also use DCRAW in it too. But I'll have to give it a try. A new pretty certain update is coming from Capture One that will support the X-trans files. Looking forward to that!
Delete